Orthogonal Render
The Orthogonal Render panel (VIEW3D_PT_orthogonal_render) automates
the production of the six standard orthographic views of a mesh — Front,
Back, Left, Right, Top, Bottom — and assembles them into a
print-ready SVG plate (tavola) at a true metric scale.
It is the tool used to turn a photogrammetric or laser-scan model of a single piece (a block, an architectural element, a find) into a documentation sheet suitable for print or for on-screen zooming.
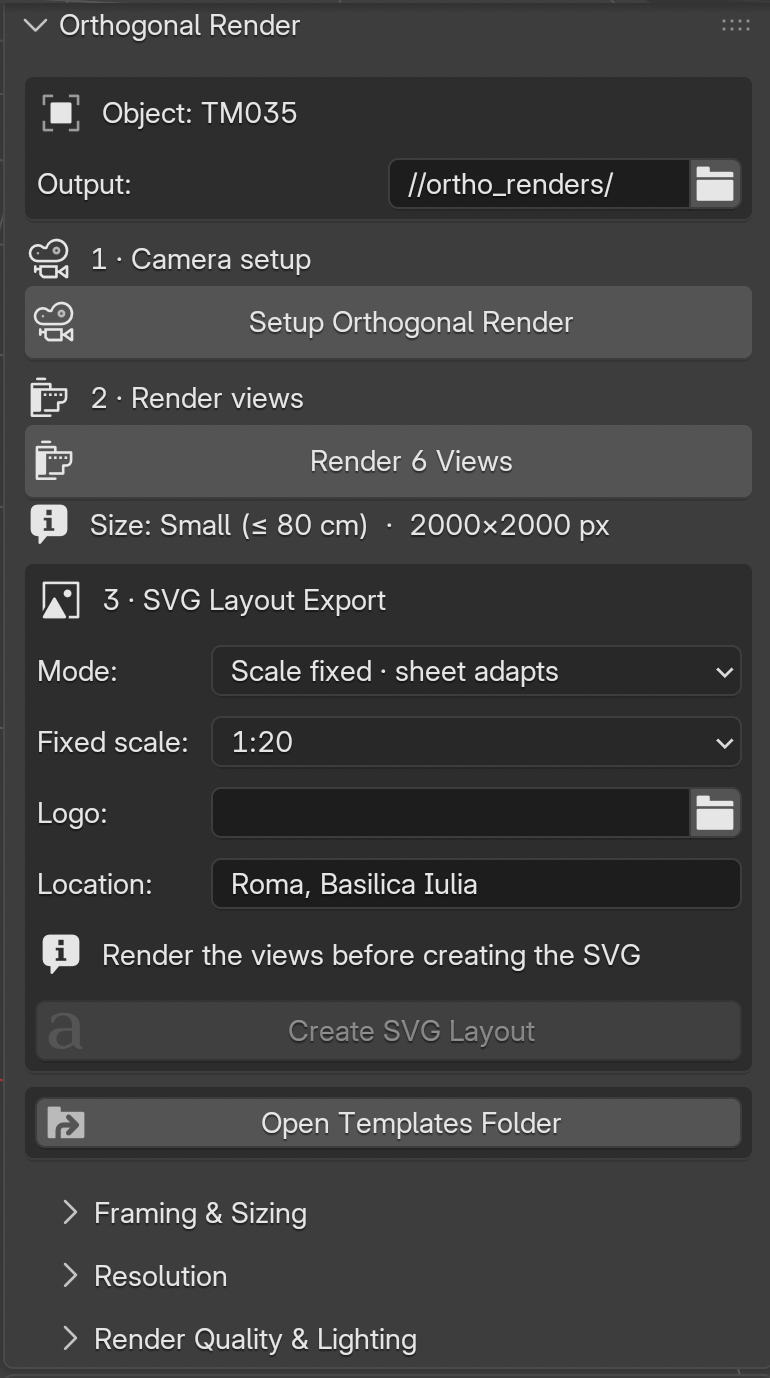
Fig. 58 The Orthogonal Render panel, organised around the three-step workflow.
Source: orthogonal_render.py. Sidebar tab: 3DSC. Default state:
collapsed (DEFAULT_CLOSED).
The panel is organised as a three-step workflow — 1 Camera setup → 2 Render views → 3 SVG Layout Export — followed by three collapsible sub-panels holding the fine configuration (Framing & Sizing, Resolution, Render Quality & Lighting). Most projects never need to open the sub-panels: the defaults are sensible.
At the top the panel shows the active Object and the Output folder where
the renders and the SVG are written. The .blend file must be saved before
rendering (the PNGs are written relative to it).
Object name cleaning
3DSC-managed objects carry typed affixes — a type prefix (OB_ objects,
ME_ meshes) and a Level-of-Detail suffix (_LOD0 … _LODn). The
plate shows the bare identifier: an object called ME_B1_LOD0 prints
as B1. Names without these affixes are shown unchanged. The rendered
PNG files keep the full object name, so nothing else in the pipeline is
affected.
Step 1 — Camera setup
- Setup Orthogonal Render (
object.setup_orthogonal_render) Creates (or reuses) the
OrthoRenderCamera, an orthographic camera framed to the active object’s real bounding box, with six keyframed poses — one per view. It also builds the three-point TriLamp light rig parented to the camera (see Render Quality & Lighting).The camera scale follows the object size times the Frame Margin, so objects of any size are always fully framed.
Existing light rig is preserved
Running Setup again does not rebuild an existing light rig by default, so any manual light adjustment you made is kept. To force a fresh rig, tick Rebuild Light Rig (see below) before pressing Setup.
Step 2 — Render views
- Render 6 Views (
render.orthogonal_views) Renders the six orthographic views to the Output folder as
<object>_FR.png,_BA,_RI,_LE,_TO,_BO.
Below the button the panel reports the object’s size bucket and the render resolution that will be used, e.g. Size: Small (≤ 80 cm) · 2000×2000 px. The label reflects the live Size thresholds.
The Bottom view is rendered as the true view from below, oriented N-up like the Top view (its left/right are mirrored, as a genuine underside view). This is handled at the render camera; the templates stay neutral.
What needs a re-render vs. a re-setup
Changing Samples, Engine, Denoise, Device or a Resolution value takes effect on the next Render — you do not need to re-run Setup. Only the Frame Margin (which resizes the camera) requires re-running Setup + Render.
Step 3 — SVG Layout Export
- Create SVG Layout (
render.create_orthogonal_svg) Composes the six rendered views into an SVG plate using the selected template, filling in the title block (object name, dimensions, optional logo and location) and drawing the graphic scale bar and the Scala 1:x caption. Enabled only once the blend is saved and at least one view has been rendered.
The scale behaviour is governed by the Mode:
- A3 fixed · scale adapts (
FIXED_SHEET) The sheet is always A3; the scale adapts so the piece always fits the same paper. Small pieces print at 1:10, larger ones at 1:20, climbing the round-scale ladder (1:25, 1:50, 1:100 …) if the piece would overflow the box. Because bigger pieces also get more render resolution, the same A3 can be opened on screen and zoomed while staying sharp. This is the mode for a consistent, single-paper archive.
- Scale fixed · sheet adapts (
FIXED_SCALE) You choose a fixed drawing scale once (Fixed scale: 1:2, 1:5, 1:10, 1:20 …); every plate is drawn at that scale and the paper grows (A2 → A0) to the smallest sheet that fits the piece. The tool warns if the piece overflows the largest available sheet. This is the mode when the publication requires a constant scale.
- Legacy
The original
MASTER_*templates, with no metric-scale processing.
Other fields in this step:
- Fixed scale
Only shown in Scale fixed mode. The list is built dynamically from the installed
SCALE_*templates, so it grows automatically as new templates are added (see Templates and scales).- Logo
Optional image placed in the title block. Leave empty for none (or drop a
logo.pnginto a template folder).- Location
Optional provenance caption printed bottom-left under the silhouette, e.g. Roma, Basilica Iulia.
Framing & Sizing
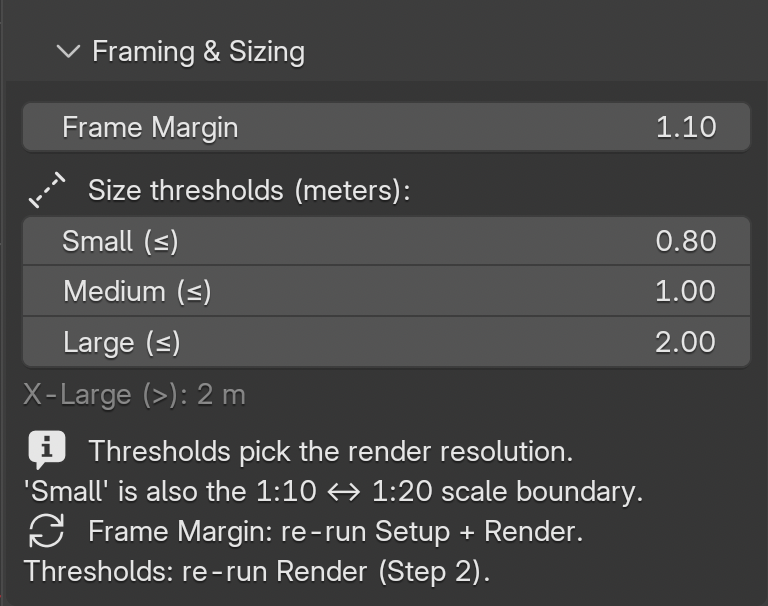
Fig. 59 Framing & Sizing sub-panel: frame margin and the size thresholds.
- Frame Margin
Padding around the object inside the camera frame (
1.10= 10 % air). Changing it requires re-running Setup + Render.- Size thresholds (meters) — Small (≤), Medium (≤), Large (≤)
The three cutoffs that sort an object into four buckets. X-Large is the open bucket above Large and is shown read-only (it has no upper bound), so all four are visible.
The Small threshold has two jobs
Besides selecting the Small render resolution, the Small cutoff is
also the 1:10 ↔ 1:20 scale boundary in A3 fixed mode: pieces up to
this size print at 1:10, larger ones at 1:20. The default is 0.8 m —
the largest piece that fits an A3 box at 1:10.
Changing a threshold takes effect on the next Render (Step 2).
Resolution
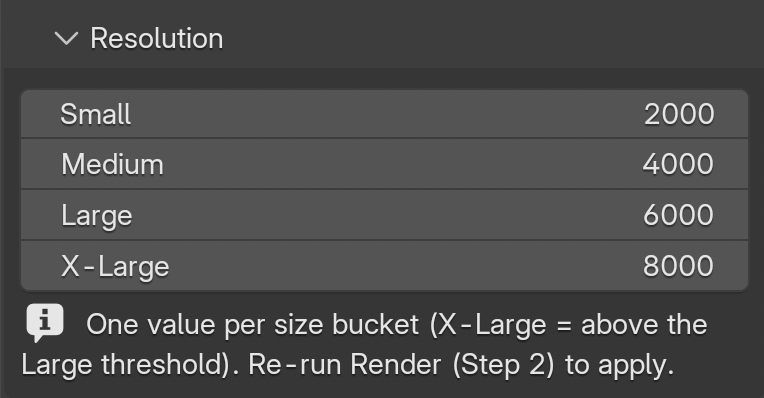
Fig. 60 Resolution sub-panel: one pixel resolution per size bucket.
One render resolution per size bucket — Small (default 2000²), Medium (4000²), Large (6000²), X-Large (8000²). Larger pieces get more pixels so that, in A3 fixed mode, the plate stays sharp when zoomed on screen.
There are four resolutions but only three thresholds, because four buckets need three boundaries (X-Large = everything above the Large threshold).
Changing a resolution takes effect on the next Render (Step 2).
Render Quality & Lighting
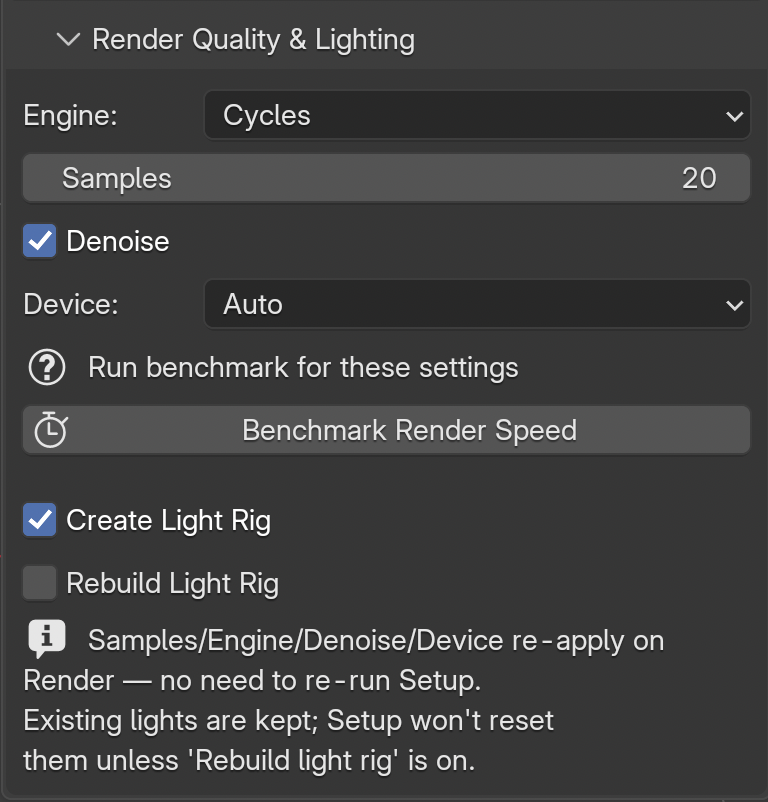
Fig. 61 Render Quality & Lighting sub-panel.
- Engine
Cycles (default, best quality) or EEVEE (much faster, lower fidelity).
- Samples
Samples per pixel. Defaults to a low
20for a fast look; raise it if the views look noisy — with Denoise on, 20 is usually clean enough for documentation.- Denoise
Applies denoising (Cycles), letting you use fewer samples.
- Device
Auto / GPU / CPU. A warning appears if GPU is chosen but no GPU compute device is configured in Preferences > System.
- Run benchmark / Benchmark Render Speed (
render.ortho_benchmark) Calibrates a render-time estimate for the current engine/device. Once calibrated, the panel shows an estimate for the six views.
- Create Light Rig
Whether Setup builds the three-point light rig.
- Rebuild Light Rig
Shown only when a rig already exists. When on, the next Setup rebuilds the rig from scratch, resetting positions, energy and keyframes — use it only when you want to discard manual light tweaks.
Templates and scales
- Open Templates Folder (
render.open_templates_folder) Opens the on-disk folder holding the SVG templates so they can be added or replaced. 3DSC searches user folders first, then the bundled templates.
Template naming follows SCALE_1-<denominator>_<paper>_<capacity> for the
fixed-scale family (e.g. SCALE_1-10_A2_1m) and FIXED_A3_* for the
A3 family. A correctly named SCALE_* template with the standard
image_view boxes is discovered automatically: the Fixed scale menu and
the paper auto-selection pick it up with no configuration.
Typical workflow
Save the
.blendfile and select the mesh.Press Setup Orthogonal Render (Step 1).
Press Render 6 Views (Step 2).
Choose the Mode (and, in Scale fixed, the Fixed scale), set an optional Logo and Location, then press Create SVG Layout (Step 3).
Remember
In A3 fixed mode the scale is chosen for you and printed on the plate; in Scale fixed mode you set the scale once and the paper grows to fit. Both modes always produce a truthful graphic scale bar and Scala 1:x caption.