Segmentation
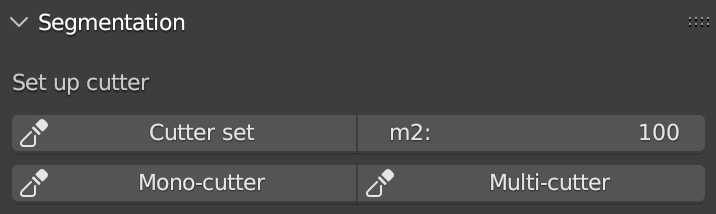
Fig. 47 Segmentation panel
The Segmentation panel is centered on cutter-based splitting workflows.
Cutter set + m2
Cutter set generates a cutter grid based on the active mesh extent and the selected square meters value (m2).
Before creation, if the active object scale is not 1,1,1, the tool shows a warning popup and can apply scale automatically.
Generated cutters are organized in the root collection named _cutter.
Cutters are moved to _cutter (not duplicated in the source object collection).
Cutter availability
The panel shows the number of cutters currently available in scene.
A Delete all cutters command removes all cutter meshes from _cutter.
Multi-cutter / Mono-cutter
Multi-cutter (main workflow): the active target mesh is cut by selected cutter objects; if no cutters are selected, all cutters available in _cutter are used automatically.
Mono-cutter (advanced workflow): one active cutter mesh projects cuts on selected non-cutter meshes.
Both modes are enabled only when cutters are available.
Pre-cut topology check
Before segmentation, target meshes can run a basic topology cleanup (merge/remove doubled vertices) to reduce knife projection issues. The panel includes a toggle (Topology pre-clean before cut) to enable/disable this step depending on model quality and performance needs.
Remember
Before using this tool, it’s necessary to control the scale of each 3D object that must be segmented. To control the scale of a 3D object it is recommend to check the scale value in the Scale panel, located within the Item tab, on the Sidebar of Blender. If the 3D object is the result of a 3D survey, it must match its real dimensions. If the scale values of the 3D object are not equal to 1 (in XYZ), the user must modify the scale and apply the transformation (ctrl+a -> Scale, or ctrl+a -> All transforms).
To set a regular grid, useful to segment a 3D object with the Segmentation tool, it is necessary to define the area of each tile of the grid compared with the dimension of the 3D object (to be segmented). Before generating the Cutter grid, user can adjust the extent of each tile of the grid by changing the Area value (m2) on the right side of the Set up cutter panel.
After pressing the Cutter set button, if the dimension of the grid does not correctly fit the dimension of the 3D object, user can: select all the tiles of the grid (on the outliner of Blender, every tile of the grid is automatically named as cutter followed by a consecutive number .001, such as cutter.001) and scale them using the scale command of Blender (in this case, the reference point for the scaling action is automatically placed, by the add-on, on the lower left corner of the grid). It is strongly recommended to use Top Orthographic view of Blender to set the position of the Cutter grid.
After clicking on the Cutter set button, a grid will appear in the viewport of Blender. The grid will fully cover the entire XY-plane extension of the mesh that needs to be cut. By default, the Cutter grid consists of square faces with 10-meter edges.