Photogrammetry paint
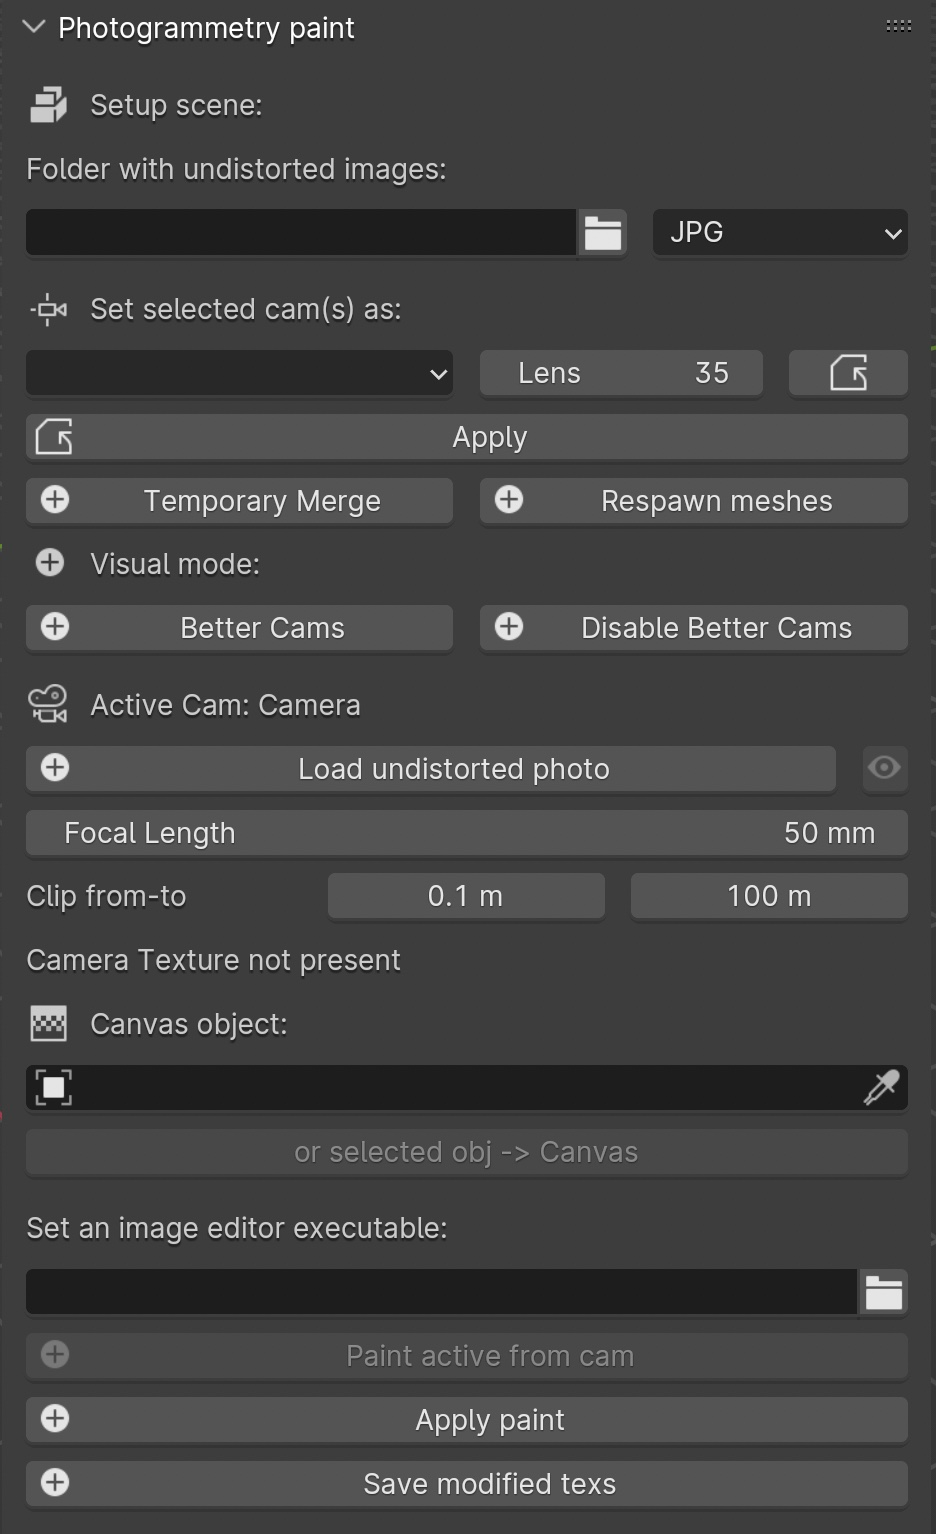
Fig. 57 Photogrammetry Paint panel
The Photogrammetry Paint panel in Blender is tailored for enhancing photogrammetric workflows. It provides a suite of tools for image and texture editing, enabling the user to work efficiently within the 3D environment. This panel facilitates various tasks such as:
manage undistorted images;
merge and separate meshes for texture painting;
adjust camera settings for image projection;
integrate images with external image editors for in-depth texture work.
The Setup Scene section initializes the scene for photogrammetric texture editing.
Within the Folder with Undistorted Images section the user can assign a directory to indicate where undistorted images are stored before using them during the texture painting.
The Set Selected Cam(s) As section includes several buttons:
Lens: Select the type of lens used to capture your images.
Focal Length: Input the focal length of the camera lens.
Apply: Save your configured camera settings.
Temporary Merge: Combine selected meshes for collective texturing.
Respawn Meshes: Separate previously merged meshes back to their original state.
The Temporary Merge function allows users to temporarily join two mesh objects in the scene. This feature is particularly useful for tasks that require meshes to be combined, such as texture painting to correct imperfections. For instance, users can utilize a clone stamp to transfer texture from one part of a mesh to another, effectively treating the meshes as a single unit. This can also be useful for creating a single UV unwrap atlas for multiple objects. After the necessary operations are completed, the “Respawn” button can be used to separate the meshes and return them to their original state.
The Visual Mode section inlcudes two functions: - Better Cams: Enhance camera visualization for easier editing. - Disable Better Cams: Revert to the standard camera view.
The Active Cam section displays the camera that is currently being used for editing. This part of the panel presents three important functions:
Load Undistorted Photo: Load the undistorted image for the active camera, ready for texture painting.
Focal Length/Clip from-to: Fine-tune the active camera’s focal length and clipping range for precise texture projection.
Camera Texture Not Present: Notification when a camera texture is missing.
Canvas Object section allows to simply select the object which will receive the projected textures.
The Set an Image Editor Executable section permits to specify the path to an external image editor for advanced texture editing.
Within the Post-Processing in External Image Editors section it is possible to apply and save the final result.
After pressing the Paint Active from Cam button, the user engages in a post-processing phase, typically in an external image editor such as GIMP or Photoshop. Here is what generally occurs during this phase witihn GIMP/Photoshop:
Open Image Editor: GIMP or Photoshop launches with two instances; one displaying the active camera’s view and the other showing the undistorted image.
Copy/Paste Textures: * Use CTRL+A and CTRL+C to select and copy the entire undistorted image. * Paste it onto the canvas that represents the 3D model.
Clone Brush Tool: Utilize the clone brush to remove unnecessary parts of the photograph and make chromatic adjustments. This ensures that the newly applied texture blends seamlessly with the existing textures.
Finalizing Texture: Once the texture editing is complete: * Disable the background layer in the image editor to isolate the new texture. * Save the new texture by overwriting the existing file or as a new file to be used as a patch.
Apply New Texture in Blender: Back in Blender, the Apply Paint function transfers the edited texture onto the 3D model.
Save and Update Model: Hit Save Modified Textures to save your changes, solidifying the improved texture on the model.
Remember
It’s important to periodically save your work in the external editor and keep track of version changes to ensure a smooth workflow.
Leverage the Photogrammetry Paint panel to ensure your textures align perfectly with the undistorted images, creating high-quality, realistic 3D models.